Last reviewed August 2026
ComfyUI’s portable installer for Windows requires no Python installation, no Git knowledge, and no command-line interaction — the entire setup is a single downloaded archive that runs after extraction. The portable build bundles its own embedded Python environment and all dependencies. Download the archive from the official GitHub releases page, extract it to any folder, double-click run_nvidia_gpu.bat, and the interface opens in a browser tab. The only prerequisite is an NVIDIA GPU with at least 4GB of VRAM and up-to-date drivers.
What Is ComfyUI and Why Do People Prefer It Over Automatic1111?
ComfyUI is a node-based interface for running Stable Diffusion, FLUX, and other diffusion models that represents the generation pipeline as a visual graph rather than a settings panel. Where Automatic1111 exposes options as form fields and dropdown menus, ComfyUI shows the actual data flow: model loader connects to sampler, sampler connects to VAE decoder, decoder connects to image output. According to the ComfyUI GitHub repository, this architecture makes complex multi-model workflows possible without writing code.
The node-based approach has made ComfyUI the dominant tool in the AI art community since mid-2025. ControlNet, IP-Adapter, inpainting, upscaling, and video generation all work as additional nodes dropped into the same canvas. For anyone already using free AI image tools through web interfaces, ComfyUI represents the step toward full local control without the steep learning curve of command-line tools.
The portable installer, maintained by ComfyUI’s developer comfyanonymous, was introduced specifically to eliminate the technical barrier. It packages everything into a self-contained directory that does not touch the system Python, the system PATH, or the Windows registry.
How Do You Download and Extract the Portable Build?
Visit the ComfyUI GitHub releases page, download the latest ComfyUI_windows_portable archive (approximately 1.5GB compressed), and extract it to a location with at least 15GB of free space. The archive is a 7z file. Windows 11 handles 7z natively; Windows 10 users need 7-Zip installed to extract it.
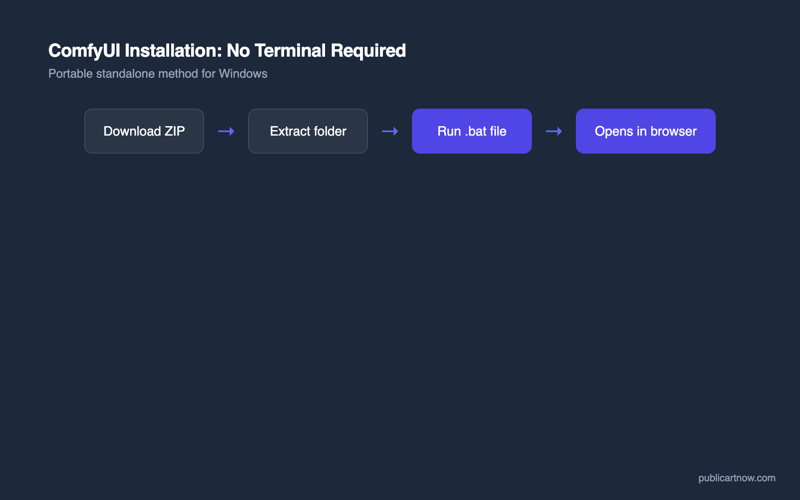
Choose an extraction location on an SSD rather than a hard drive. Model loading and image saving both benefit from fast sequential read/write speeds. A path like D:\ComfyUI works well — avoid paths containing spaces or special characters, as some custom nodes handle these poorly. The extracted folder contains the full ComfyUI application, an embedded Python 3.11 installation, and pre-installed PyTorch with CUDA support.
No administrator privileges are required for extraction or execution. The portable build runs entirely from its own directory and can be moved, copied, or deleted without affecting other software on the machine.
How Do You Launch ComfyUI for the First Time?
Double-click run_nvidia_gpu.bat inside the extracted folder — a terminal window opens showing loading progress, and after 10-30 seconds a browser tab opens at http://127.0.0.1:8188 showing the ComfyUI canvas. The batch file activates the embedded Python environment, sets the correct library paths, and starts the ComfyUI server. No environment variables need to be set manually.
On first launch, ComfyUI presents a default workflow that demonstrates a basic text-to-image pipeline. This workflow will not produce an image until a model checkpoint is placed in the correct folder. The terminal window must remain open while using ComfyUI — closing it shuts down the server. The browser tab is just a client; the actual processing happens in that terminal window.
If the batch file fails with a CUDA error, the GPU drivers need updating. Visit NVIDIA’s driver download page and install the latest Game Ready or Studio driver for the specific card installed. ComfyUI requires CUDA 12.x support, which means drivers from late 2023 onward.
Where Do Model Files Go?
Place Stable Diffusion checkpoints in ComfyUI\models\checkpoints, LoRA files in ComfyUI\models\loras, and ControlNet models in ComfyUI\models\controlnet — ComfyUI scans these directories on startup and lists available models in its node dropdowns. The folder structure mirrors the model types exactly:
| Model Type | Folder Path | Typical File Size | Where to Download |
|---|---|---|---|
| SD 1.5 checkpoint | models/checkpoints/ | 2-4 GB | Hugging Face, CivitAI |
| SDXL checkpoint | models/checkpoints/ | 6-7 GB | Hugging Face, CivitAI |
| FLUX.1 checkpoint | models/checkpoints/ | 12-24 GB | Hugging Face (Black Forest Labs) |
| LoRA / LoHa | models/loras/ | 10-200 MB | CivitAI, Hugging Face |
| ControlNet | models/controlnet/ | 700 MB – 2.5 GB | Hugging Face (lllyasviel) |
| VAE | models/vae/ | 300-800 MB | Hugging Face |
| Upscale model | models/upscale_models/ | 60-200 MB | OpenModelDB |
For a first test, download any SD 1.5 checkpoint from CivitAI or Hugging Face — the Realistic Vision v5.1 model (~2GB) is a reliable starting point. Drop the .safetensors file into the checkpoints folder, restart ComfyUI (or press the refresh button on the checkpoint loader node), and it appears in the model dropdown.
How Do You Run Your First Workflow?
Load the default workflow (already present on first launch), select a model in the “Load Checkpoint” node, type a prompt in the positive text node, and click “Queue Prompt” — the image generates and appears in the preview node within seconds to minutes depending on the GPU. The default workflow contains five nodes connected in sequence: checkpoint loader, two text encoders (positive and negative prompts), a sampler, and an image preview.
The portable installer has made ComfyUI genuinely accessible to people who have never opened a command prompt. What previously required installing Python, cloning a Git repository, creating virtual environments, and resolving dependency conflicts is now a download-and-extract operation. The node-based interface then makes the actual image generation process visible and modifiable without writing a single line of code.
Custom nodes — community-built extensions that add features like face restoration, video generation, or advanced upscaling — install through ComfyUI Manager, which itself installs by extracting a folder into ComfyUI\custom_nodes\. The portable build handles custom node dependencies automatically through its embedded pip.
For related reading, see creating consistent AI characters and setting up a local AI art workflow.
Does the portable build update automatically?
No. Download the update script from the releases page or replace the ComfyUI folder contents manually. Custom nodes and models in their respective folders are preserved during updates if only the core files are replaced.
Can the portable build run on an AMD GPU?
Not on Windows. The portable build bundles NVIDIA CUDA libraries only. AMD users on Windows need DirectML support through a separate community fork. On Linux, AMD GPUs work through ROCm with the standard ComfyUI installation.
How much disk space does a full ComfyUI setup need?
The base installation requires approximately 5GB. With three to four model checkpoints, several LoRAs, and ControlNet weights, expect 30-50GB total. An SDXL-focused setup with all common ControlNet models needs roughly 40GB.
What happens if a custom node breaks ComfyUI?
Rename or delete the problematic folder inside custom_nodes/ and restart. ComfyUI loads each custom node independently, so removing one does not affect others. The manager tracks installed nodes for easy disabling.